Friday, September 24, 2010

LEDs

One of the common issues folks have with boats is enough electrical power from their battery banks. Most sailors know more than I ever will about batteries, chargers, solar or wind power, gensets, etc... However, I do know that my wife likes to turn on lights, and the more lights that are on, the less time my batteries will last. I don't yet have a separate starting battery, so this is even more critical.

One solution is to use LEDs instead of the incandescent bulbs for lighting. The LEDs last longer, burn cooler, and use about 1/4 of the amount of power as an equivalent Halogen bulb.

Legacy has about 25 interior light fixtures, not counting the shear lighting which is made up of rope lights. All but the Nav table light and head lights use 10w G4 Halogen bulbs. The bulbs in the lights in the heads are a 5w G4 Halogen frosted bulb. Not counting the Nav table light, there are 5 types of fixtures on the boat. It is nice that Catalina chose fixtures that use the same bulb. This makes keeping spares much easier. What I wanted to do was find an affordable LED alternative to the 10w G4 Halogen. The Halogen give off great light, but they are also incredibly hot. Not only is this heat unwanted in the Summer, but they are exposed so are a real burn hazard.

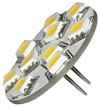
This is the bulb that I found. You can order it directly from the company, LEDwholesalers.com, or you can do what I did and order through Amazon.com. If you order enough from Amazon, the shipping is free. This may offset the sales tax paid at Amazon depending on where you are. LEDWholesalers.com describes this bulb as G4 Base 18 Warm White LED 183 Lumen 360 degree 12V ACDC The price as of now on these through Amazon is only $14 each, they are $16 right now from LEDWholesalers.com Either way, much less expensive than other alternatives I've found. Anyway, it produces 186 Lumens of warm white light at the cost of 2.6 watts, 220mA @ 12v.


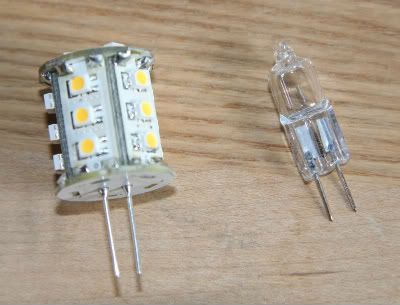
Here is a photo of the LED bulb compared to the G4 Halogen. Notice the different in size.


I ordered three of the bulbs to try out. I finally got a chance to get down to Legacy and give them a try. It was daylight, but I installed some in the aft cabin and blocked the ports to make it dark. I then took some comparison shots of the lights.

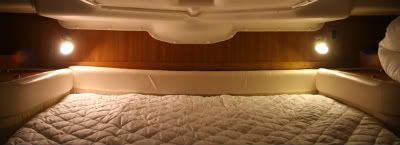
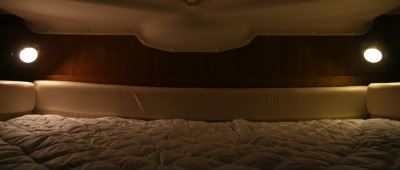
First we have the reading lights by the aft bunk. Here are two shots. The Halogen is on the left, the LED on the right. The color balance won't be exact, the Canon Digital Rebel was set for Auto color balance since was too lazy to do a custom color balance. On my screen, the LED has a faint green cast that wasn't there in the boat.


Next we've got the square lights that are in the upper corners of the aft cabin as well as one in the front cabin. I couldn't do side by side shots of these obviously, so here they are in sequence.

Here is the stock Halogen Bulb.


Here is the LED Bulb.


You'll notice there is very little difference between the two. However, here is a shot of the LED bulb in the fixture. Notice how low the LED bulb hangs. It does fit, but the three diodes on the end of the bulb are right up next to the cover. The pins of the LED are longer than the G4 bulbs,so one option would be to cut the pins shorter. Another would be to bend the pins to the side.


I think a better alternative would be to use a different bulb. One option would be the Disc Type G4 Base Side Pin 15 SMD LED, 10 Watt Holagen 197 Lumen Bulb. The pins would need to be bent at 90 degrees but it would fit and all the light would be aimed down, which is where you want it anyway. The price of this bulb from LEDWholesalers.com is $16 each.


Another alternative is a similar bulb but one that has the pins in the center back. Then you don't have to worry about bending the pins. Through Amazon again I found G4 Base LED Lamp - Rear Pin, Warm White 140 Lumen manufactured by a company called "Scintiluna". It is a back pin lamp similar to the one pictured below and was only $9 a piece. I ended up getting three of them. They claim 140 Lumens a 2w. Who knows?


Update: I received the bulbs from Scintiluna. G4 Base LED Lamp - Rear Pin, Warm White 140 Lumen . Total cost for 3 includeing S&H was $31.47. Here is what they actually look like.

Photobucket
Photobucket

Here is the bulb installed in the fixture.
Photobucket


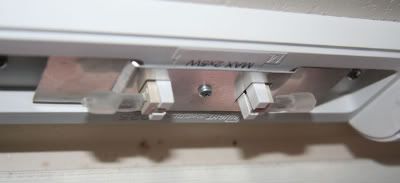
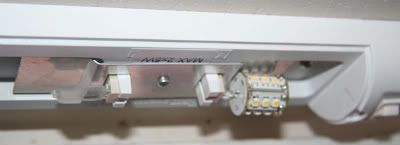
OK, next we have the small swivel spot lights that are all over the Catalina 400. These provide great lighting and it is handy they can be aimed. There are two of these light in the aft cabin right in front of the mirror above the engine. Here are a couple shots of those. Here the LED is on the left, the Halogen is on the right. Ignore the man in the mirror.


At least in my 400 (Hull #328) there are a total of three of these types of fixtures, two in the aft head and one in the front. They have a white plastic cover retained by a small phillips head screw. Inside, are two frosted 5w G4 bulbs. I have no idea why they are frosted.


The LED tower bulb fit in this fixture just fine. Here is a shot of it again with one LED bulb installed. While I don't have a picture of it, the cover went on just fine and it gave great light.


Even though that bulb fits OK in the fixture, with the I decided to try the 15 led flat, round bulb by LEDWholesalers that was pictured earlier. I think they will just fit in the fixture and should give good light. I'll update when I get those flat bulbs installed.

Update: Here is the fixture with the Disc Type G4 Base Side Pin 15 SMD LED, 10 Watt Holagen 197 Lumen Bulb Replacemnt For RV Camper Trailer Boat Marine Warm White, 1114WW bulbs installed. These were $16 each from LEDWholesalers through Amazon.

Here they are installed. The light is actually very good and much brighter than the two 5w bulbs provide. The fixture is marked not to exceed 2x5w bulbs.

Photobucket
Photobucket

I didn't take any shots of the two sconce lights in the main cabin but this LED tower bulb fits well in that fixture and gives great light.
Update: Here is the sconce light with the 18 LED tower bulb installed.
Sconce light

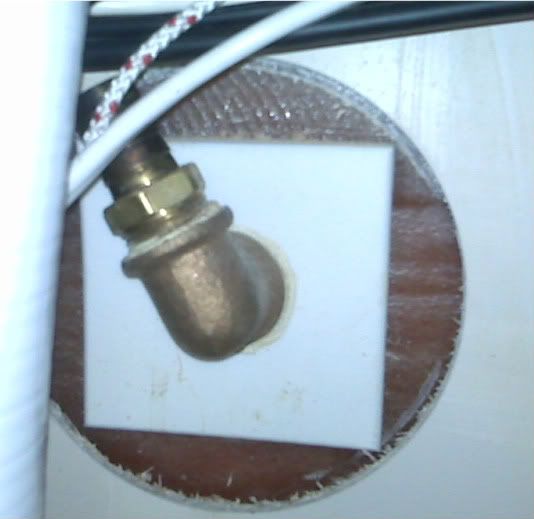
The only odd ball on my boat is the flexible light at the Nav table. It is the only fixture that uses a bayonet bulb. I wasn't able to determine the size when I was on the boat, I could tell it was either a 6w or 8w halogen bulb. I need to bring my more recent glasses to the boat. However, when I got back home and looked at the shot that I took of it, the "6w" was pretty easily readable. The wonders of digital photography. So I just need to find an LED replacement for this bulb.


Since I'm not at the boat, I don't know if it is a BA9s or BA7s bulb. My guess is a BA9s as the BA7s bases seem to be more prevalent in Europe. For now, I won't do anything with it.

Sunday, September 19, 2010

Holding tank vent

With the direction of some other Catalina 400 owners, I found the aft holding tank vent behind the access panel in the shower. The vent thru-hull was right there. I took off the hose, created a packing with some small line, and back-flushed the vent hose with a water hose. It seemed to flow free. Looking at the clam shell vent though, I think that I want to replace it with a standard through hull. The right angle of the OEM vent works well for the hoses, and I know that I can find a plastic thru-hull vent in the right diameter with a 90 angle to replace it.

Here is a shot of the inside of the thru-hull. The large white hose to the left is the aft holding tank pump out hose. What I haven't figured out is how to actually remove this fitting. Yet another question I'll ask current Catalina owners. They are very helpful.


Here is a vent that I'm considering replacing it with.


I may also just use a straight through Marelon vent but I'm not sure if there is enough clearance for the hose.

Sunday, September 12, 2010

Heads and tanks

One of the issues we discovered with Legacy right away was that the aft head didn't work. It would pump out just fine, but not flush with raw water. We just used the forward head until I had the time to tear into it to find out the problem.

The heads in the Catalina 400, at least in my year, were a Wilcox-Crittendon Headmate. This is a typical, cheap, marine toilet. When I opened it up, I found that their is a two-flap valve on the intake side of the pump. Essentially this is a flat piece of rubber, about the size of dual plug electrical outlet, with two flaps cut into it. Attached to these flaps are brass and stainless steel washers to provide weight and rigidity to the flaps. When I took it apart, these washers fell out of the housing. The rivet holding them on had corroded completely away.

I picked up a Refurbishing kit for the head from Fisheries Supply in Seattle. This kit, about $75, contains various seals, springs, and pistons for the head. The only part I needed was this dual flapper valved. Next time, I'm going to see if I can get that part alone from Wilcox-Crittendon. I took the head apart, greased up the parts with Super Lube, replaced the one part, and the head works fine.

Unfortunately, I think it is just a matter of time before that part rusts away again. With the way the head is setup, there is no way to flush the head with fresh water, which would reduce the rust significantly. On Vision, our Catalina 36, my Dad had plumbed the head so the head intake shared the line with the sink drain. The advantage was that after using the boat, you could then close the intake through-hull, and run fresh water in the sink using that fresh water to then flush the head. This resulted in only fresh water being left in the pump assembly, as well as the discharge lines between the head and the holding tank. This cuts down on odors significantly.

Looking at the heads, I could do this pretty easily in the forward head, as all the fittings are located together under the head sink. However in the aft head, the head intake is in a separate compartment from the sink plumbing and there isn't any good way to join them. I'll have to give that some thought.

Speaking of heads, we emptied both holding tanks on Sunday. On the 400, each Waste outlet is on a different side of the boat, making it less than convenient to empty both tanks. However, we managed without too much of a mess. Unfortunately, the city dock that has the pump-out only has it available from April through October, meaning we'll have to find another location, not nearly as convenient, for the winter months.

Finally. Since we put Legacy in the water, we had not put fuel in it. The fuel gauge still read "Full" but according to some other 400 owners, this gauge can be unreliable. We had put only 8 hours on the engine since we put it in the water (in 2 weeks of ownership we put 4% of the total engine hours on this 5 year old boat). When we filled up the diesel tank, it took 7.7 gallons. Typically, fuel consumption for these is about 1 gal/hr. When Legacy was shipped, her fuel tank was essentially full!

A decent night's sleep

After getting the boat in the water and to our marina, my wife and I went back the next night and spend the night on the boat. One of the primary reasons for choosing the Catalina 400 was it's aft cabin. After spending a night on the boat, we are very happy with our choice. The berth is very spacious, even for two tall folks. While you do have to watch to keep from hitting your head, there is enough headroom in the berth and the cabin to be comfortable. The biggest issue will be finding sheets to fit the berth. It is a bit wider than a Queen at the head, and a bit narrower at the foot. While we could buy specialty sheet from Catalina, I'm not willing to spend the money.

Saturday, August 28, 2010

Splashed!

We got Legacy in the water yesterday afternoon and sailed it from the Hylebos waterway to Gig Harbor.

The commissioning went pretty well. I hired two guys to do the work, Steve Brown and Glenn Cowling who work as "Something Special". Silly name, but these guys are great. They did work for my folks on the Catalina 36, and come highly recommended by many sailors around the Tacoma area. After watching them work, I highly recommend them.

The yard had an opening for the Travellift at 4:00 in the afternoon. By 5:00pm, the backstays were on, the rig tensioned correctly, and we were set. Initially, my wife and I were going to sail it to our slip in Gig Harbor with another couple (our broker and her husband), both avid sailors and friends. Unfortunately, she wasn't able to get away at the last minute as she had another sailboat she had to show.

So, this meant my wife and I would take our maiden voyage on our own. This made my wife a bit nervous as she doesn't have that much sailing experience and I've not had experience with anything larger than our Catalina 36.

The sun was out, it was warm, and their was a nice 10 knot breeze. That is an almost unheard of combination hear in the Puget Sound. We might be cold, sunny and windy, or cold, cloudy and windy, or sunny, warm and dead calm, but never warm, sunny, with a nice sailing breeze. A good omen?

Initially we decided to motor, but after clearing the Hylebos waterway, with the conditions so perfect we decided to unfurl the Genoa. That went smoothly enough and we were sailing about about 5.5 knots under the Genoa alone. The wind was about 13 knots apparent, and we decided to unfurl the main. I've not used a roller furled main before so I knew this would be a bit of a learning curve.

We got the main out and at about the same time the wind picked up to about 15-16 knots apparent. We soon found out what we hadn't secured well enough in the cabin. "Legacy" handled wonderfully. With the 130% Genoa, the helm was nicely balanced. We found that the two of us could easily handle the boat as she is setup.

I then decided to try reefing the main. It didn't go so smoothly. However, I got it done eventually and practiced bringing the main out and in under sail, playing with the loads to get an idea of the best way to do it with the furler. I can see that getting the tensions and angles correct to avoid any folds or creases in the main will be a trick. All in all, it sailed wonderfully.

Getting into my slip was another story. This is a new slip to us and this was the first time we had approached it from the water, in a harbor that I haven't been real familiar with in over 40 years. We are at the inmost end of a long dock. There is a lot less room there than what it looked like when I saw the slip from the dock. It is a starboard tie with a turn to port to bow in to the slip. The wind was from my stern as I ghosted in between the docks. I ended up making my turn too late, being more used to how the 36 will spin. I got the bow in the slip, but the wind was pushing my stern beyond the slip. Unfortunately, there isn't any more room to just back out and come at the slip from the other direction. I figured I was OK and would use the prop-walk to kick my stern to port. Well once again, I was thinking about how my 36 behaved. The 400 has very, very little prop-walk compared to the 36.

it was ugly, but in the end, I didn't damage my boat, the dock, or hit my slip-mates boat to my port. Fortunately, the marina was empty so no-one saw my grand display of docking skills. On the other hand, if there had been someone to toss a line to, it would have gone much smoother.

So today, we will go back out to the boat and start to clean up the aftereffects of a 1000 miles of Interstate travel and a few days in a very dirty yard.

Saturday, August 21, 2010

Shipping "Legacy"

On Friday, Aug 20th, Legacy was picked up in Marina Del Rey and put on a trailer for the trip North. You will note that she still has the name Sally Marie II on her and the rather silly mermaid on the bow. Those will be removed ASAP.

If things go smoothly, (and they have so far) Legacy should be delivered to Hylebos Marina Tuesday at 1:00pm.


Wednesday, August 18, 2010

Autoprop it is

I finally decided on the propeller. I'm going to go with the Autoprop. It was a decision between the Autoprop and the Max-Prop. Here is how I broke the decision down.

Pros for Autoprop vs Max-Prop
1) Autoprop is more efficient under power than Max-Prop. Lots of arguments can be made about the so-called, "auto" pitching of the Autoprop, but it is simply a more efficient prop than the Max-Prop. In the Salish Sea, we spend a lot of time under power (unfortunately).

2) Don't have to circumcise the prop shaft with the Autoprop like you do the Max-Prop. This was a big one. Once you cut off the end of the shaft, then using another prop, such as if I hit a rock, damage the prop, and need a replacement, becomes more difficult. With the Autoprop, I can always throw on the old 3 blade if need be.

Cons for Autoprop vs Max-Prop
1) The Autoprop isn't as efficient under sail as the Max-Prop, as it doesn't feather as well, but I'm not going to be racing and the Autoprop is still a lot more efficient than the fixed prop on there now.

2) The Autoprop is more expensive. While a buddy of mine claims to be able to get a Max-Prop for me for less than direct from PYI, he hasn't gotten back to me. If he could, the Max-Prop would be about $1500 less than the Autoprop. That is a LOT of money.

3) Max-Prop is local to me. Any problems and they are just up the freeway about an hour. Being local, there are a lot of folks that have used them in this area.

4) Timeliness of delivery. I could get the Max-Prop next-day. The autoprop is more likely next week. Given that the boat may be sitting on the hard waiting for the prop, this is a consideration as well. However, AB-Marine assured me that I could get it early next week (we'll see if AB-Marine comes through).

So I finally decided that the "pros" for Autoprop outweighed the "cons" and ordered it this morning from AB-Marine.

Depending on who you listen to, the boat will either magically float across the water, burning nary a drop of fuel, or the blades will fly off, causing catastrophic failure and resulting in the sinking of the vessel. We will see...

Saturday, August 14, 2010

Decision, decisions, verse 2 - Radar Reflectors

We all know that having a radar reflector is a good idea. Anytime you sail anywhere near commercial shipping lanes, it is a good idea to be seen. For those of us that sail in the Salish Sea we have frequent encounters with commercial shipping of all kinds and have to cross these commercial lanes to get most anywhere. Fiberglass or wooden boats don't show up on radar so we usually use some type of device designed to reflect back the radar signal to it's source so that we can seen. All very good and reasonable.

For Legacy, I have been thinking about what type of reflector to use. It was suggested to me by Ron Marcuse on the Catalina 400 Yahoo group to consider a Tri-Lens reflector. As I looked into it, what I found out was a bit distressing.

For years on our boats, our family has used an octahedral reflector like the Davis Echomaster. We just assumed this would work just fine. Most of the time we hoisted it on a spreader halyard using the handy attachment points at the top and bottom of the reflector. This placed the reflector in the vertical position, rather than the ideal "catch rain" position (as shown in the photo). What I didn't know until I did a little research, is that hanging the reflector vertically reduces it's effectiveness significantly. According to testing done by a number of organizations, including Practical Sailor and the UK Marine Accident Investigation Branch, this design simply is not very effective at best, and is less so if not properly mounted or if the boat is on a heel. The problem is that if the reflector is oriented just right to the radar source, it reflects pretty well. However, is also has a lot of dead zones, angles where there is would be no return to the radar source. Apparently, many commercial radar systems have alarms who will only sound if it picks up a consistent radar target. If the target keeps disappearing, the alarm won't sound so you are at the mercy of whoever is manning the radar display. So, while the Davis Echomaster is relatively inexpensive (for a piece of boat equipment), it may not be worth the bother.

So if what I've used for years isn't very effective, what about the Tri-Lens? The Tri-Lens uses three Luneberg lenses to focus the radar energy and then reflect it back. Testing reveals that it is very effective without the large dead zones in the octahedral designs. This makes the average Radar Cross Section, much better. The problem though, is that for any radar reflector, the strength of the return signal is based on it's Radar Cross Section (RCS) . The RCS is related exponentially to the size of the of the reflector. Also to be effecting the cross section size of the reflector needs to be at least a few times the size of the wavelength of the radar signal, which for the S-band radar used by many (most?) commercial vessels, is about 4".

All this means is that the standard Tri-Lens, where each Luneberg lens is about 5.25" inches in diameter is marginal. The design produces a very consistent signal with few dead spots that is effected little by heel. However, that consistent RCS is not that large. The large Tri-Lens has Luneberg lenses that are about 7.25" in diameter and provide a much better signal return. However, the standard Tri-Lens already weighs about 5.5lbs. The large Tri-Lens is about 15 pounds!

Cost is another issue. The standard Tri-Lens is over $300 at West Marine. The large Tri-Lens is over $800. They also have a mini Tri-lens that is under $200 but from what I can tell, it wouldn't be worth it.

There is another option. The Echomax 230 reflector is a series of stacked corner arrays in a plastic cylinder. It performs very as long as it remains upright. As soon as the boat heels, even a little, the performance drop way down. This makes using it on a sailboat under sail problematic. It still has the same problems of expense and weight as the Tri-Lens. The Echomax 230 weighs about 5.5lbs and, with mast mounting bracket, costs over $350 at West Marine.

So what to do? The Davis Echomaster might get you noticed in the fog if the radar watch on a commercial vessel was paying attention and the vessel was in exactly the right position and the reflector was mounted exactly the correct way. Too many "ifs" for my liking. Still, it is inexpensive. I think all things considered, the standard Tri-Lens would be the best option, balancing performance, cost, and weight. I could mount it a foot or two above the radar dome on the mast and it would be reasonably high, and out of the way of most of the rigging.

We'll see....

Decisions, decisions verse 1- Propeller

As we work to figure out the logistics of getting the purchase finalized, and transporting Legacy (still named the Sally Marie II) up to Tacoma, there are all kinds of other decisions that I'm faced with.

The Catalina 400 comes with an 18"x 2" fixed prop. When the boat was hauled for the survey, that big prop looks like a sea anchor hanging back there. I started to consider a feathering or folding prop. With a little research, two options presented themselves, Max-Prop and Autoprop.

There are some real advantages to these propellers. Under forward power, the blades rotate to give forward thrust, under no power the blades feather or fold to present less drag, and when in reverse, they rotate to provide reverse thrust. The advantages are much less drag when sailing and much better reverse performance than a fixed prop. Other owners of Catalina 400s report an increase in sailing speed of at least 1 knot using these propeller and much less prop-walk in reverse. This would make backing into a slip much easier. The cost is significant. I was quoted $3,150 from Max-Prop and found an Autoprop for sale for $3999! The other disadvantage is that there is increased maintenance required as the mechanisms need to be greased regularly. While the manufacturers may claim otherwise, this would be difficult to do in the water, so the boat would need to be hauled at least every two years to have this done.

Max-Prop is made by PYI Inc. , a company based in Lynnewood, WA., essentially a bit over an hour up I-5 from me. These are the same folks who manufacture the PSS Shaft Seal used on many production sailboats. Max-Prop is a feathering propeller. The Max-Prop has flat blades, rather than the curved blades common on propellers. This allows the blades to feather, presenting a small profile to the water. Because of the flat blades, there is a small reduction in prop efficiency in forward gear.

Max-Prop installation requires that you cut off maybe an inch of the prop shaft. This means that using a prop other than the Max-Prop could be an issue if I ever decided I wasn't happy with it, or needed to replace the prop after an accident or failure.

Autoprop is a little different. It's blades are curved and cupped, giving a little more efficiency than the Max-Prop (or so claims Autoprop). This also results in a bit more drag than Max-Prop under sail. They also are designed so that the pitch angle varies with the speed of the boat and the power from the engine. Frankly, this seems a little like voodoo, but it apparently works. Sailors report significant improvements in under-power performance with the Autoprop.

So what to do? The advantages to Autoprop are increased powered performance, no modification to the prop shaft, and easier installation. The Max-Prop on the other hand has less drag under sail, easier maintenance, is a local company. The Max-Prop likely would be as much as $1500 less in cost as I have a friend who is a dealer. The other issue is that I could easily get a Max-Prop in a few days, plenty of time to install it before Legacy is splashed here in Tacoma. I don't know about the availability of an Autoprop but my guess it would be at least a few weeks which would delay the commissioning of Legacy.

Who knows, I have a little time to think about it but at this point I'll probably go with the local favorite, Max-Prop.

Friday, August 13, 2010

Inspection and Sea Trial


We had some specific requirements when looking for a Catalina 400. We wanted a newer boat. After owning an older boat, I've found I'm more about using a boat, than working on a boat. While my Dad loved a project, I love a sail.

We also wanted in-mast furling. Yeah, I know about sail shape, lack of roach etc... I also know that if it takes 10 minutes to take off a sail cover and another 10 minutes to wrestle it back on later, that the sails won't go up for a 20 minute sail. I'm not that much of a purist.

We found a 2005 Catalina 400 in Marina Del Rey, CA and made an offer. I flew down for a sea trial, inspection and survey. All went well. Very few problems identified. Now it is just a matter of working out the logistics of getting the boat shipped up to Tacoma and put in the water again.