Sunday, May 29, 2011

Companionway Doors


One of the features that we really liked on my folks Catalina 36, were the teak companionway doors that they had made. While at the Seattle boat show this winter, we ran into the same gentleman who made those doors and asked him to make some for Legacy.

He has a website at Cruising Concepts and does nice work in teak for all kinds of projects. He isn't cheap, and he isn't fast, but I like everything that I've seen him do.

The Catalina 400 comes with the typical teak companionway boards. While these are a great for using when out in heavy seas, they aren't the most convenient for coastal cruising. Catalina provides a handy shelf in the cabin for the boards, but that is space that we would like to use for other things. So the answer was to install some hinged companionway doors that could be left in place, or removed if you like.

My woodworking skills are not that good. Well, most of my skills aren't that good. So while the installation is not that difficult, it did take me a few hours, which was a couple hours longer than it should have. During the installation, you do have to use a sanding block to adjust the fit of the doors for your own boat. If I can do it, anyone can.

I was pleased with the way they turned out. We opted for teak doors with screens and removable plexiglass windows. Rather than varnish, I elected to just oil the doors.

From outside, doors closed. Notice how you can't see into the cabin, but just see reflections on the windows.


Outside, doors open.


Inside cabin, doors closed. Notice how well you can see through the dark plexiglass.

Sunday, February 6, 2011

SmartPlug

Yesterday I converted Legacy's shore power plug to a SmartPlug. I have been wanting to do this since I bought the boat and it was one of the things that I was going to do to my 36 before I decided to move to the 400. Fisheries Supply in Seattle had some good Seattle Boat Show pricing so I decided to pull the trigger on it. It is not a cheap conversion since it is a relatively small start-up company with lots of R&D expenses. Getting ETL approval of their system has been a challenge but they received it in October. They are still working on approval for the dockside plugs.

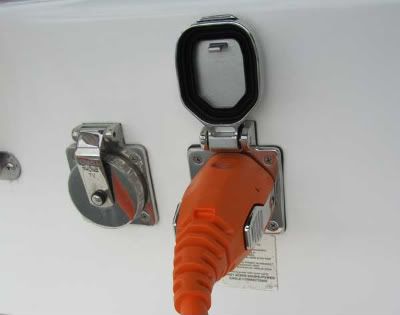
Anyway, I purchased a conversion kit as well as a molded, 50ft shore power chord. My rational for doing this was that I always like having two shore power chords. I'm essentially a lazy person and want as little to do as I'm heading our for an overnight or weekend as possible. It isn't hard to coil up a shore power chord and bring it on board, but I prefer to keep one on the boat and leave one permanently on the dock. Part of the reason is that I'm particular about how my dock chord is attached to the dock. So, I'll convert the end of the chord that I keep on the boat, and use a new molded chord for the one that is left on the dock. This increased the cost a lot, but for me it is worth it.

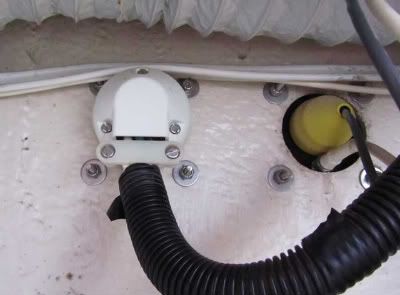
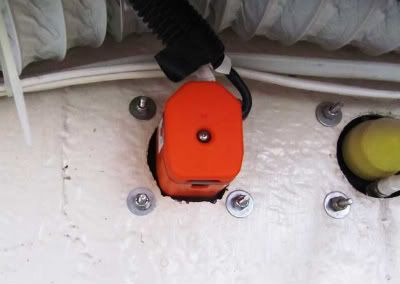
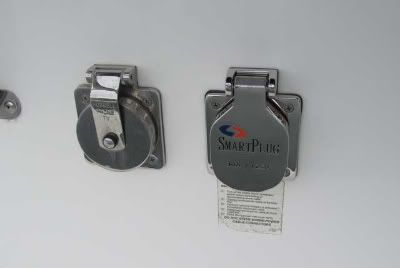
Changing out the plug on the on the boat isn't that difficult. However, it would have been a lot easier and quicker with another pair of hands. I have long arms, and I'm not sure someone shorter, with shorter arms, would have been able to do it solo. The hole that was drilled in my stern to accept the existing plug (receptacle or boatside connector is more accurate I suppose) is just slightly too small to accept the SmartPlug connector. My Dremel would have made short work of making it a tad larger, but since I had no 120 power on the boat (since it was shut off and disconnected obviously) and I didn't have a long enough extension chord, I had to use a hand file. It took a bit longer but was not difficult. Dropping tools, nuts, and washers down into the aft lazarette and retrieving them took a bit longer as well.

One thing that I didn't have with me and I wish I did was some electrical grease. After wiring the connector, I would have liked to cover the connections with grease to keep moisture out of the connections. That is something that will be pretty easy to do when I go out to boat since the connector is readily accessible to the aft lazarette. Here are some photos:

Interior of existing connector:


Interior of SmartPlug connector:


Exterior, connector installed:


Exterior with power chord attached:


Friday, September 24, 2010

LEDs

One of the common issues folks have with boats is enough electrical power from their battery banks. Most sailors know more than I ever will about batteries, chargers, solar or wind power, gensets, etc... However, I do know that my wife likes to turn on lights, and the more lights that are on, the less time my batteries will last. I don't yet have a separate starting battery, so this is even more critical.

One solution is to use LEDs instead of the incandescent bulbs for lighting. The LEDs last longer, burn cooler, and use about 1/4 of the amount of power as an equivalent Halogen bulb.

Legacy has about 25 interior light fixtures, not counting the shear lighting which is made up of rope lights. All but the Nav table light and head lights use 10w G4 Halogen bulbs. The bulbs in the lights in the heads are a 5w G4 Halogen frosted bulb. Not counting the Nav table light, there are 5 types of fixtures on the boat. It is nice that Catalina chose fixtures that use the same bulb. This makes keeping spares much easier. What I wanted to do was find an affordable LED alternative to the 10w G4 Halogen. The Halogen give off great light, but they are also incredibly hot. Not only is this heat unwanted in the Summer, but they are exposed so are a real burn hazard.

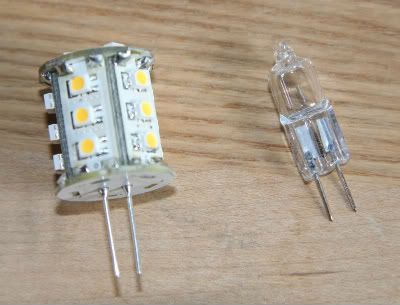
This is the bulb that I found. You can order it directly from the company, LEDwholesalers.com, or you can do what I did and order through Amazon.com. If you order enough from Amazon, the shipping is free. This may offset the sales tax paid at Amazon depending on where you are. LEDWholesalers.com describes this bulb as G4 Base 18 Warm White LED 183 Lumen 360 degree 12V ACDC The price as of now on these through Amazon is only $14 each, they are $16 right now from LEDWholesalers.com Either way, much less expensive than other alternatives I've found. Anyway, it produces 186 Lumens of warm white light at the cost of 2.6 watts, 220mA @ 12v.


Here is a photo of the LED bulb compared to the G4 Halogen. Notice the different in size.


I ordered three of the bulbs to try out. I finally got a chance to get down to Legacy and give them a try. It was daylight, but I installed some in the aft cabin and blocked the ports to make it dark. I then took some comparison shots of the lights.

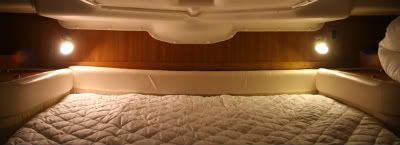
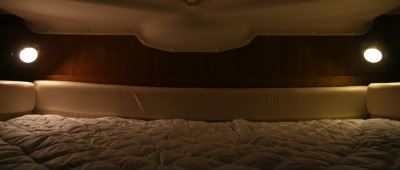
First we have the reading lights by the aft bunk. Here are two shots. The Halogen is on the left, the LED on the right. The color balance won't be exact, the Canon Digital Rebel was set for Auto color balance since was too lazy to do a custom color balance. On my screen, the LED has a faint green cast that wasn't there in the boat.


Next we've got the square lights that are in the upper corners of the aft cabin as well as one in the front cabin. I couldn't do side by side shots of these obviously, so here they are in sequence.

Here is the stock Halogen Bulb.


Here is the LED Bulb.


You'll notice there is very little difference between the two. However, here is a shot of the LED bulb in the fixture. Notice how low the LED bulb hangs. It does fit, but the three diodes on the end of the bulb are right up next to the cover. The pins of the LED are longer than the G4 bulbs,so one option would be to cut the pins shorter. Another would be to bend the pins to the side.


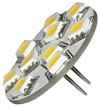
I think a better alternative would be to use a different bulb. One option would be the Disc Type G4 Base Side Pin 15 SMD LED, 10 Watt Holagen 197 Lumen Bulb. The pins would need to be bent at 90 degrees but it would fit and all the light would be aimed down, which is where you want it anyway. The price of this bulb from LEDWholesalers.com is $16 each.


Another alternative is a similar bulb but one that has the pins in the center back. Then you don't have to worry about bending the pins. Through Amazon again I found G4 Base LED Lamp - Rear Pin, Warm White 140 Lumen manufactured by a company called "Scintiluna". It is a back pin lamp similar to the one pictured below and was only $9 a piece. I ended up getting three of them. They claim 140 Lumens a 2w. Who knows?


Update: I received the bulbs from Scintiluna. G4 Base LED Lamp - Rear Pin, Warm White 140 Lumen . Total cost for 3 includeing S&H was $31.47. Here is what they actually look like.

Photobucket
Photobucket

Here is the bulb installed in the fixture.
Photobucket


OK, next we have the small swivel spot lights that are all over the Catalina 400. These provide great lighting and it is handy they can be aimed. There are two of these light in the aft cabin right in front of the mirror above the engine. Here are a couple shots of those. Here the LED is on the left, the Halogen is on the right. Ignore the man in the mirror.


At least in my 400 (Hull #328) there are a total of three of these types of fixtures, two in the aft head and one in the front. They have a white plastic cover retained by a small phillips head screw. Inside, are two frosted 5w G4 bulbs. I have no idea why they are frosted.


The LED tower bulb fit in this fixture just fine. Here is a shot of it again with one LED bulb installed. While I don't have a picture of it, the cover went on just fine and it gave great light.


Even though that bulb fits OK in the fixture, with the I decided to try the 15 led flat, round bulb by LEDWholesalers that was pictured earlier. I think they will just fit in the fixture and should give good light. I'll update when I get those flat bulbs installed.

Update: Here is the fixture with the Disc Type G4 Base Side Pin 15 SMD LED, 10 Watt Holagen 197 Lumen Bulb Replacemnt For RV Camper Trailer Boat Marine Warm White, 1114WW bulbs installed. These were $16 each from LEDWholesalers through Amazon.

Here they are installed. The light is actually very good and much brighter than the two 5w bulbs provide. The fixture is marked not to exceed 2x5w bulbs.

Photobucket
Photobucket

I didn't take any shots of the two sconce lights in the main cabin but this LED tower bulb fits well in that fixture and gives great light.
Update: Here is the sconce light with the 18 LED tower bulb installed.
Sconce light

The only odd ball on my boat is the flexible light at the Nav table. It is the only fixture that uses a bayonet bulb. I wasn't able to determine the size when I was on the boat, I could tell it was either a 6w or 8w halogen bulb. I need to bring my more recent glasses to the boat. However, when I got back home and looked at the shot that I took of it, the "6w" was pretty easily readable. The wonders of digital photography. So I just need to find an LED replacement for this bulb.


Since I'm not at the boat, I don't know if it is a BA9s or BA7s bulb. My guess is a BA9s as the BA7s bases seem to be more prevalent in Europe. For now, I won't do anything with it.

Sunday, September 19, 2010

Holding tank vent

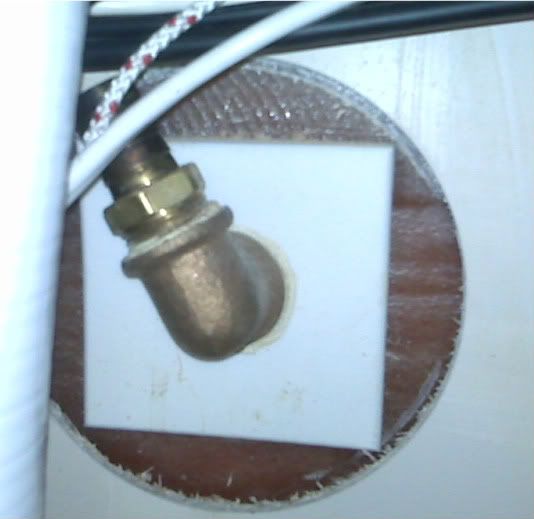
With the direction of some other Catalina 400 owners, I found the aft holding tank vent behind the access panel in the shower. The vent thru-hull was right there. I took off the hose, created a packing with some small line, and back-flushed the vent hose with a water hose. It seemed to flow free. Looking at the clam shell vent though, I think that I want to replace it with a standard through hull. The right angle of the OEM vent works well for the hoses, and I know that I can find a plastic thru-hull vent in the right diameter with a 90 angle to replace it.

Here is a shot of the inside of the thru-hull. The large white hose to the left is the aft holding tank pump out hose. What I haven't figured out is how to actually remove this fitting. Yet another question I'll ask current Catalina owners. They are very helpful.


Here is a vent that I'm considering replacing it with.


I may also just use a straight through Marelon vent but I'm not sure if there is enough clearance for the hose.

Sunday, September 12, 2010

Heads and tanks

One of the issues we discovered with Legacy right away was that the aft head didn't work. It would pump out just fine, but not flush with raw water. We just used the forward head until I had the time to tear into it to find out the problem.

The heads in the Catalina 400, at least in my year, were a Wilcox-Crittendon Headmate. This is a typical, cheap, marine toilet. When I opened it up, I found that their is a two-flap valve on the intake side of the pump. Essentially this is a flat piece of rubber, about the size of dual plug electrical outlet, with two flaps cut into it. Attached to these flaps are brass and stainless steel washers to provide weight and rigidity to the flaps. When I took it apart, these washers fell out of the housing. The rivet holding them on had corroded completely away.

I picked up a Refurbishing kit for the head from Fisheries Supply in Seattle. This kit, about $75, contains various seals, springs, and pistons for the head. The only part I needed was this dual flapper valved. Next time, I'm going to see if I can get that part alone from Wilcox-Crittendon. I took the head apart, greased up the parts with Super Lube, replaced the one part, and the head works fine.

Unfortunately, I think it is just a matter of time before that part rusts away again. With the way the head is setup, there is no way to flush the head with fresh water, which would reduce the rust significantly. On Vision, our Catalina 36, my Dad had plumbed the head so the head intake shared the line with the sink drain. The advantage was that after using the boat, you could then close the intake through-hull, and run fresh water in the sink using that fresh water to then flush the head. This resulted in only fresh water being left in the pump assembly, as well as the discharge lines between the head and the holding tank. This cuts down on odors significantly.

Looking at the heads, I could do this pretty easily in the forward head, as all the fittings are located together under the head sink. However in the aft head, the head intake is in a separate compartment from the sink plumbing and there isn't any good way to join them. I'll have to give that some thought.

Speaking of heads, we emptied both holding tanks on Sunday. On the 400, each Waste outlet is on a different side of the boat, making it less than convenient to empty both tanks. However, we managed without too much of a mess. Unfortunately, the city dock that has the pump-out only has it available from April through October, meaning we'll have to find another location, not nearly as convenient, for the winter months.

Finally. Since we put Legacy in the water, we had not put fuel in it. The fuel gauge still read "Full" but according to some other 400 owners, this gauge can be unreliable. We had put only 8 hours on the engine since we put it in the water (in 2 weeks of ownership we put 4% of the total engine hours on this 5 year old boat). When we filled up the diesel tank, it took 7.7 gallons. Typically, fuel consumption for these is about 1 gal/hr. When Legacy was shipped, her fuel tank was essentially full!

A decent night's sleep

After getting the boat in the water and to our marina, my wife and I went back the next night and spend the night on the boat. One of the primary reasons for choosing the Catalina 400 was it's aft cabin. After spending a night on the boat, we are very happy with our choice. The berth is very spacious, even for two tall folks. While you do have to watch to keep from hitting your head, there is enough headroom in the berth and the cabin to be comfortable. The biggest issue will be finding sheets to fit the berth. It is a bit wider than a Queen at the head, and a bit narrower at the foot. While we could buy specialty sheet from Catalina, I'm not willing to spend the money.

Saturday, August 28, 2010

Splashed!

We got Legacy in the water yesterday afternoon and sailed it from the Hylebos waterway to Gig Harbor.

The commissioning went pretty well. I hired two guys to do the work, Steve Brown and Glenn Cowling who work as "Something Special". Silly name, but these guys are great. They did work for my folks on the Catalina 36, and come highly recommended by many sailors around the Tacoma area. After watching them work, I highly recommend them.

The yard had an opening for the Travellift at 4:00 in the afternoon. By 5:00pm, the backstays were on, the rig tensioned correctly, and we were set. Initially, my wife and I were going to sail it to our slip in Gig Harbor with another couple (our broker and her husband), both avid sailors and friends. Unfortunately, she wasn't able to get away at the last minute as she had another sailboat she had to show.

So, this meant my wife and I would take our maiden voyage on our own. This made my wife a bit nervous as she doesn't have that much sailing experience and I've not had experience with anything larger than our Catalina 36.

The sun was out, it was warm, and their was a nice 10 knot breeze. That is an almost unheard of combination hear in the Puget Sound. We might be cold, sunny and windy, or cold, cloudy and windy, or sunny, warm and dead calm, but never warm, sunny, with a nice sailing breeze. A good omen?

Initially we decided to motor, but after clearing the Hylebos waterway, with the conditions so perfect we decided to unfurl the Genoa. That went smoothly enough and we were sailing about about 5.5 knots under the Genoa alone. The wind was about 13 knots apparent, and we decided to unfurl the main. I've not used a roller furled main before so I knew this would be a bit of a learning curve.

We got the main out and at about the same time the wind picked up to about 15-16 knots apparent. We soon found out what we hadn't secured well enough in the cabin. "Legacy" handled wonderfully. With the 130% Genoa, the helm was nicely balanced. We found that the two of us could easily handle the boat as she is setup.

I then decided to try reefing the main. It didn't go so smoothly. However, I got it done eventually and practiced bringing the main out and in under sail, playing with the loads to get an idea of the best way to do it with the furler. I can see that getting the tensions and angles correct to avoid any folds or creases in the main will be a trick. All in all, it sailed wonderfully.

Getting into my slip was another story. This is a new slip to us and this was the first time we had approached it from the water, in a harbor that I haven't been real familiar with in over 40 years. We are at the inmost end of a long dock. There is a lot less room there than what it looked like when I saw the slip from the dock. It is a starboard tie with a turn to port to bow in to the slip. The wind was from my stern as I ghosted in between the docks. I ended up making my turn too late, being more used to how the 36 will spin. I got the bow in the slip, but the wind was pushing my stern beyond the slip. Unfortunately, there isn't any more room to just back out and come at the slip from the other direction. I figured I was OK and would use the prop-walk to kick my stern to port. Well once again, I was thinking about how my 36 behaved. The 400 has very, very little prop-walk compared to the 36.

it was ugly, but in the end, I didn't damage my boat, the dock, or hit my slip-mates boat to my port. Fortunately, the marina was empty so no-one saw my grand display of docking skills. On the other hand, if there had been someone to toss a line to, it would have gone much smoother.

So today, we will go back out to the boat and start to clean up the aftereffects of a 1000 miles of Interstate travel and a few days in a very dirty yard.